
Your garage door opener just stopped responding, and you’re standing in the driveway pressing the remote button over and over, hoping it magically works. Before you call a repair company, most opener problems come down to five fixable causes you can check in the next ten minutes.
Quick Answer: Most garage door opener failures come down to five causes: dead remote batteries, misaligned safety sensors, a tripped circuit breaker, worn drive components, or a system that needs a manual reset. Start with the safety sensors — a blocked or misaligned sensor is the single most common reason an opener won’t close, according to major opener manufacturers’ troubleshooting documentation.
Table of Contents
What You Need to Know
- Check the two safety sensors near the floor first — most “won’t close” problems start there, not in the motor.
- A blinking opener light isn’t random. It’s an error code specific to your brand and model.
- Unplugging the opener for 10 seconds performs a soft reset and clears many stuck states.
- If the door reverses immediately or won’t move at all, treat it as safety-critical — don’t force it manually while powered.
- Repairs under roughly $150 are usually worth doing yourself. Above that, compare the cost against replacing the whole unit first.
Most Common Garage Door Opener Problems
Nearly every opener complaint traces back to one of twelve recognizable symptoms, and matching yours to the right row below saves you a wasted service call. Run through this before you touch a screwdriver.
| Symptom | Likely Cause | Fix | DIY or Call a Pro? |
|---|---|---|---|
| Remote does nothing, opener silent | Dead batteries or opener unplugged | Replace batteries, check outlet and breaker | DIY |
| Wall button works, remote doesn’t | Remote out of range or unpaired | Reprogram remote per owner’s manual | DIY |
| Opener hums but door doesn’t move | Trolley disconnected (emergency release pulled) | Reconnect trolley to carriage | DIY |
| Door reverses before touching the floor | Misaligned or dirty photo-eye sensors | Realign sensors, wipe lenses clean | DIY |
| Door won’t close, sensor light off | Blocked or unpowered sensor | Clear the obstruction, check sensor wiring | DIY, then Pro if wiring is damaged |
| Light blinks a set number of times when closing | Sensor alignment error code | Match the blink count to your manual’s code chart | DIY |
| Opener runs but chain or belt doesn’t move | Stripped gear or broken belt/chain | Inspect the drive mechanism | Pro |
| Door opens partway then stops | Travel limit or force setting off | Adjust the limit and force screws | DIY (carefully) |
| Loud grinding or slipping noise | Worn drive gear or loose chain | Lubricate and tighten, replace gear if stripped | DIY or Pro |
| Opener works sometimes, not always | Weak antenna signal or nearby interference | Reposition the antenna, check nearby electronics | DIY |
| Door won’t open manually after a power outage | Emergency release still engaged | Pull the release cord to reconnect the trolley | DIY |
| Opener repeatedly trips the breaker | Motor short or wiring fault | Stop resetting the breaker | Pro |
Save or screenshot this symptom chart — it covers the diagnostic path for nearly every opener complaint, regardless of brand.
Want this chart plus a full printable troubleshooting checklist? Grab the free PDF version sent straight to your inbox, and you’ll have it on hand next time an opener acts up.
Opener Won’t Respond to Remote or Wall Button
A non-responsive opener is almost always a power or pairing problem, not a motor failure. Rule these out before assuming something is broken.
Dead Batteries or an Unpaired Remote
Swap the remote batteries first — it sounds obvious, but it resolves the majority of “remote does nothing” complaints. If fresh batteries don’t fix it, the remote has likely lost its pairing with the opener’s receiver, which happens after a power surge or a factory reset.
To re-pair, locate the “Learn” button on the motor unit (usually near the light lens), press it once, then press your remote button within 30 seconds. The opener light will blink to confirm the pairing.
Wall Button Wiring or Antenna Issues
If the wall button doesn’t work but the remote does, check the low-voltage wire running from the button to the motor unit for pinches or disconnections near the wall plate. If the remote doesn’t work but the wall button does, the receiving antenna hanging from the motor unit may be tucked up out of position — pull it down so it hangs freely.
Garage Door Won’t Close (Safety Sensor Issues)
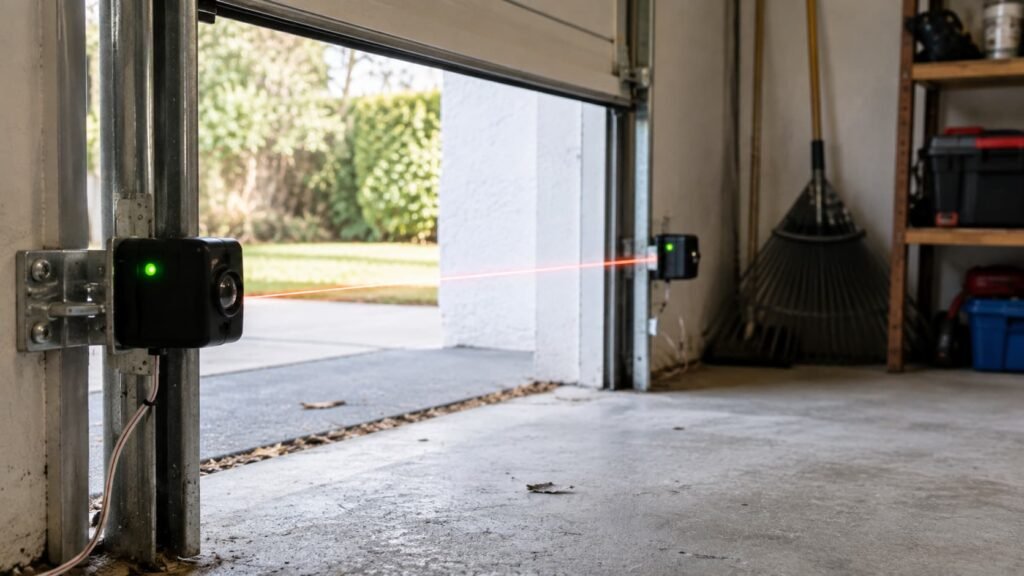
Photo-eye sensor problems cause the majority of “opener won’t close” calls, and they’re also the easiest fix on this entire list. The two sensors sit a few inches off the ground on each side of the door track, and they need a clear, aligned line of sight to each other.
Check for these three things, in order:
- Obstruction — anything in the beam’s path, including a leaf, a toy, or spiderwebs, will stop the door from closing.
- Alignment — a bumped sensor throws off the beam even when both lights appear lit. Loosen the wing nut, nudge the sensor until the indicator light stops flickering, and retighten.
- Power — if one sensor’s LED is off entirely, check its wiring connection at the sensor and at the motor unit.
This isn’t a cosmetic feature. Since 1993, U.S. federal safety standards under UL 325 have required residential garage door openers to include auto-reverse protection via photo-eye sensors, specifically to prevent the door from closing on a person, pet, or vehicle. Bypassing or disabling the sensors to “solve” a closing problem creates a genuine safety hazard rather than fixing one.
Blinking Light or Error Codes: What They Mean
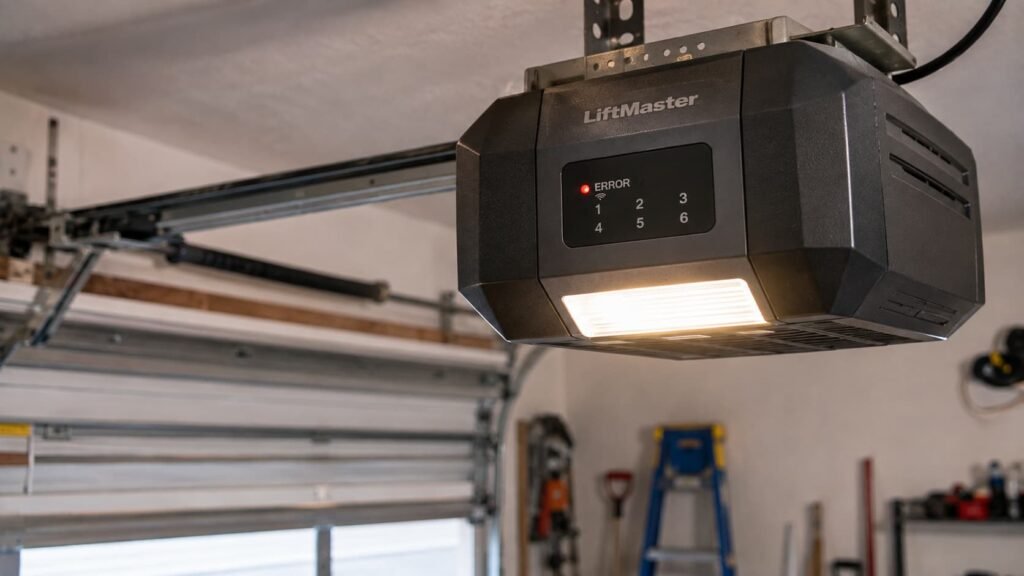
A blinking opener light is a diagnostic code, not a malfunction indicator on its own. Most modern openers flash the built-in light a set number of times to signal a specific fault — sensor misalignment, a force-setting error, or a limit-switch issue are the three most common causes across brands.
The exact meaning of each blink count is brand- and model-specific, so match what you’re seeing against your owner’s manual or the manufacturer’s code chart printed inside the motor unit’s cover panel. Counting the blinks accurately (pause, then count again) before searching for your model’s code chart will save you a repeat trip to the garage.
How to Reset a Garage Door Opener
A soft reset clears most stuck error states in under a minute, and it does not erase your paired remotes on most modern units. Here’s the process:
- Unplug the opener from its outlet. Wait 10 full seconds — this drains residual power from the circuit board and clears temporary error flags.
- Plug it back in and wait for the light to stop blinking. Most units cycle through a brief startup sequence lasting 5–10 seconds.
- Test the door with the wall button first, not the remote, to confirm the base unit is functioning before troubleshooting remote pairing separately.
- If a specific “Learn” or reset button exists on the motor unit, holding it for 6–10 seconds performs a deeper factory reset — this does erase paired remotes and keypad codes, so only use it if the soft unplug reset didn’t work.
Unplugging alone won’t erase your programmed remotes or wall codes. It only clears temporary glitches, which makes it the safe first move before you touch the dedicated reset button.
Opener Runs But Door Doesn’t Move (Motor vs. Drive Issues)
When the motor runs but the door stays put, the problem is almost always mechanical, not electrical. The two most common culprits are a disconnected trolley (check whether the emergency release cord got pulled) and a stripped or broken drive component — the chain, belt, or screw drive that actually moves the door.
The type of drive system you have changes both the likely failure point and the repair cost. If you’re not sure which drive your opener uses or want to compare durability and noise levels, our garage door opener motor types guide breaks down chain, belt, and screw drives side by side, and our complete opener comparison covers how each type performs long-term.
DIY Fix or Call a Professional?
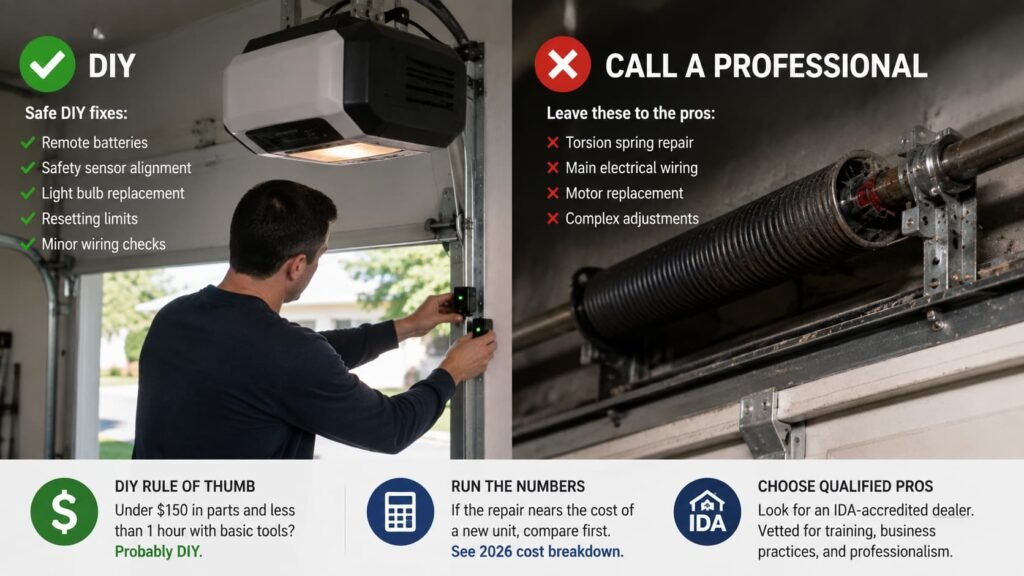
Most electrical and sensor fixes are safe DIY territory; anything involving the torsion spring or main wiring is not. The torsion spring sits under extreme tension and has caused serious injuries when handled without the right tools — that repair belongs to a licensed technician, full stop.
Use this rule of thumb: if the fix costs under roughly $150 in parts and takes under an hour with basic tools, it’s usually worth doing yourself. If a repair quote starts approaching the price of a new unit, run the numbers before committing — our garage door opener cost breakdown lays out what repairs and replacements typically run in 2026, so you can compare before you decide.
When you do call a pro, look for an IDA-accredited dealer (opens in new tab). The International Door Association vets member companies against documented business-practice and training standards, which gives you a faster way to screen out unqualified installers than a generic search result.
[CONTENT GAP: no “Best Garage Door Openers” buying guide exists yet — flag for future internal link once published]
How Long Should a Garage Door Opener Last?
A well-maintained garage door opener typically lasts 10 to 15 years, with most manufacturers rating the motor for 10,000–20,000 open-close cycles. Heavy daily use — multiple vehicles, a home office with frequent trips — shortens that window; light use stretches it.
If your opener is approaching that age range and starting to show two or more symptoms from the chart above at once, that’s usually a stronger signal to start budgeting for replacement than any single fix.
Common Mistakes to Avoid
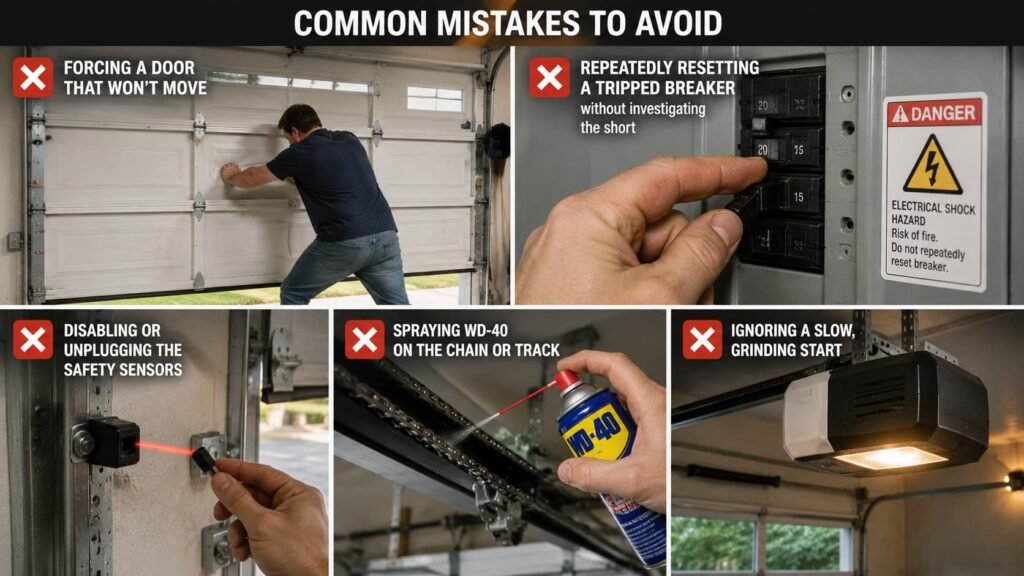
The single most damaging mistake is forcing a door that won’t move instead of finding out why it’s stuck. A few other patterns show up again and again:
- Repeatedly resetting a tripped breaker without investigating the short — this risks a fire hazard, not just a repeat trip.
- Disabling or unplugging the safety sensors to get a stubborn door to close. This removes the exact protection UL 325 requires.
- Spraying WD-40 on the chain or track as a lubricant — it attracts dust and grime; use a silicone-based garage door lubricant instead.
- Ignoring a slow, grinding start — that’s usually an early warning for a stripped gear, and it’s a cheap fix now versus an expensive one later.
Frequently Asked Questions
What are the most common problems with garage door openers?
The most frequent issues are dead remote batteries, misaligned or blocked safety sensors, a tripped circuit breaker, a disconnected trolley from the emergency release, and worn drive components like a stripped gear or broken chain. Most of these are diagnosable in under ten minutes using the symptom chart above, and the majority don’t require a professional visit.
Why is my garage door not responding to the button or remote?
Most modern openers have a dedicated “Learn” or reset button on the motor unit, typically near the light lens. Holding it for 6–10 seconds performs a factory reset that clears paired remotes and keypad codes, so it should be a last resort after a simple unplug-and-replug hasn’t solved the problem.
Does unplugging your garage door opener reset it?
Yes — unplugging the opener for about 10 seconds performs a soft reset that clears many temporary error states, including some blinking-light codes and stuck sensor readings. It does not erase your programmed remotes or keypad codes, which makes it a safe first step before trying a full factory reset.
Can I fix my garage door opener myself?
Most sensor, remote, and wiring-connection issues are safe for a confident homeowner to fix with basic tools. Anything involving the torsion spring, main electrical wiring, or a burnt-out motor should go to a licensed technician, since the torsion spring in particular carries real injury risk under tension.
Why is my garage door not responding to the button or remote?
It’s usually a power or pairing issue rather than a broken opener. Check remote batteries first, then confirm the opener itself has power. If the wall button works but the remote doesn’t, the remote likely needs re-pairing through the motor unit’s “Learn” button, which takes under a minute.
What to Do Next
If your fix involved the drive system, read our motor types guide to understand what you’re working with. If you’re weighing repair against a full upgrade, our opener comparison guide and cost breakdown will help you decide which direction makes financial sense.
Pingback: Garage Door Opener Making Noise But Not Moving – Fix Tips
Pingback: Garage Door Opener Making Noise But Not Moving? 7 Fixes